Parsing the UI
Top of the Screen
When you load up your copy of Caves of Qud and spin up a character, you'll be faced with quite a bit of information at once. Let's just take a look at the screen to see what is going on and parse out the information that is there and what is most relevant. Click on the image below to expand it if you need a better view.
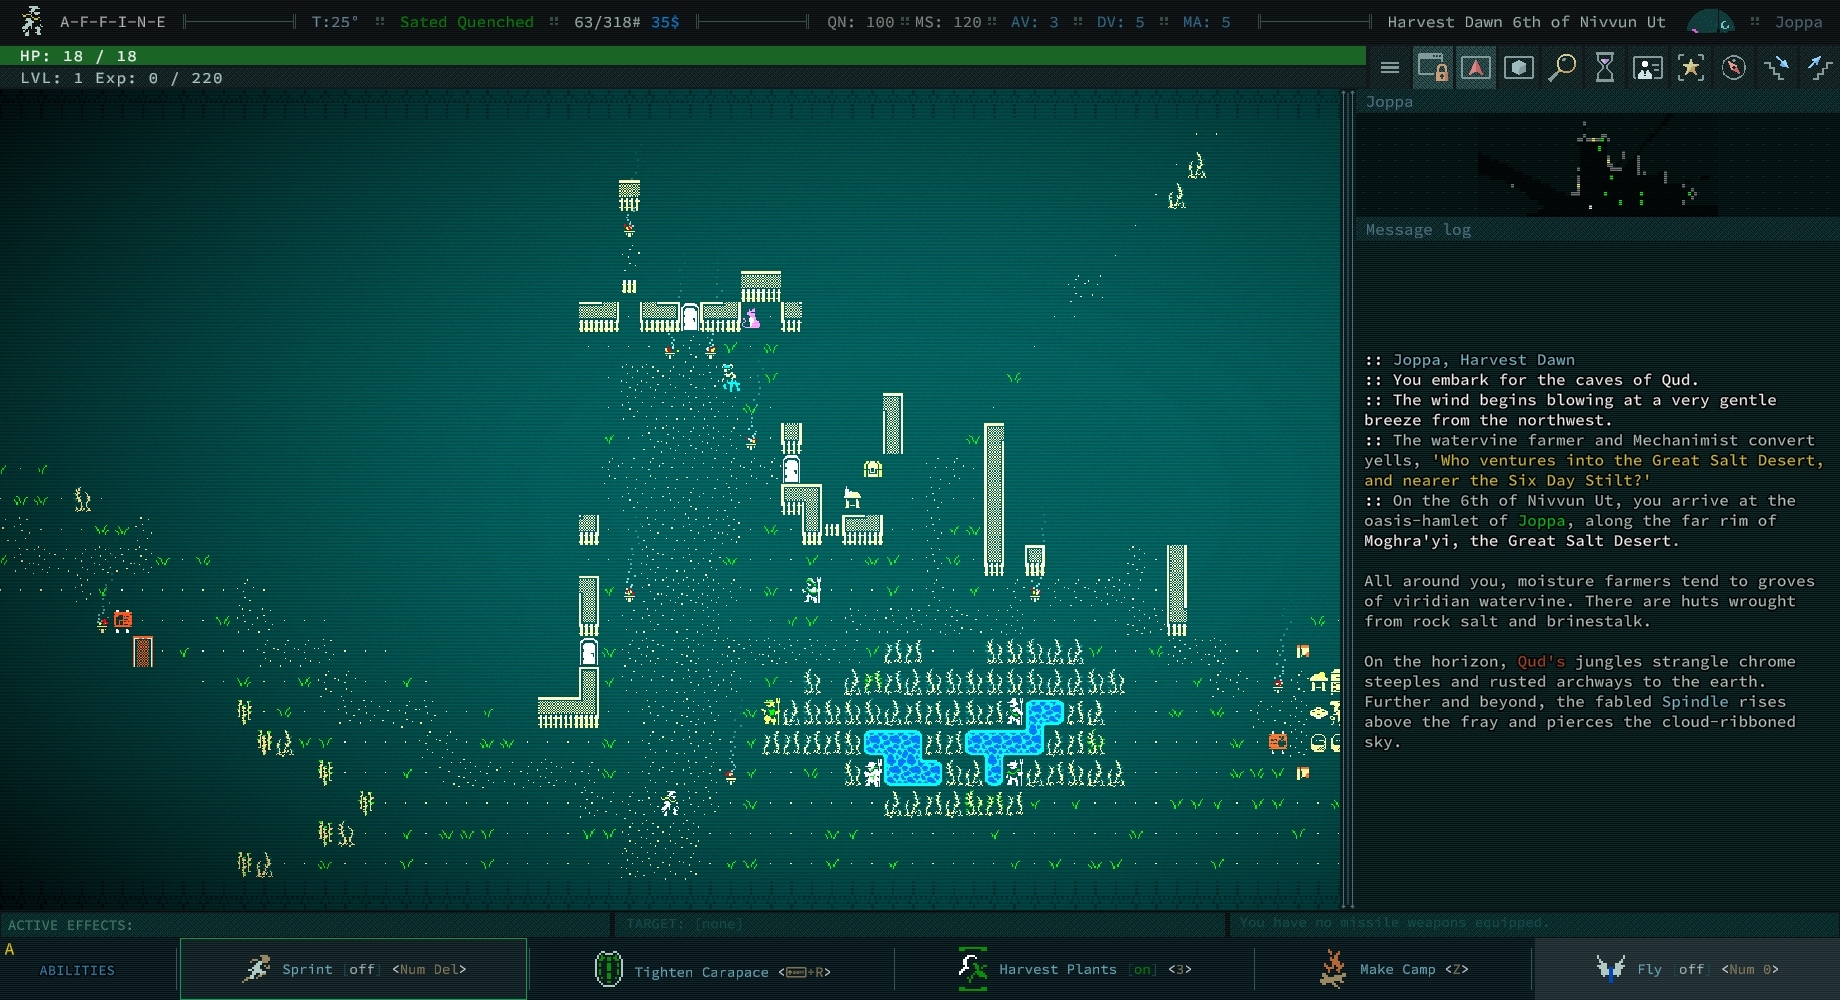
We'll go over the information from top to bottom. First, we have the image of our character at the top left and their name. Take this moment to find the corresponding icon on the game screen below; this is where our character stands relative to everything else. The name is purely for flavor, you will give it out to many creatures on your journey and they will refer to you as such.
Moving to the right, the next piece of information is our temperature T:25°. This is the ambient temperature in Celsius as felt by our character, and is normally always exactly 25 degrees. If it is lower or higher, something is heating you up or cooling you down. Generally speaking, this will only happen because some creature is lighting you on fire or freezing you with some ability but there is a dungeon that gets very cold (Bethesda Susa). Typically, you can ignore this as it won't change but if you notice you are on fire, frozen, or moving slower than you expect then check your temperature to see how bad it is.
Next, we have Sated Quenched. This is actually 2 different pieces of information: how hungry you are and how thirsty you are. Caves of Qud has both mechanics, but luckily managing them isn't quite as tedious as many survival games are. For hunger, there are 3 levels: Sated > Hungry > Famished!.
If you have
Photosynthetic Skin, the Famished! level is replaced by Wilted!. They're the same, just have different names for flavor.
If you're Sated, you don't need to eat. You can still eat up to 2 more times if you're Sated, but after that you'll have to wait until you're Hungry in order to eat again. Unless you are ![]() Carnivorouss((D), you cannot eat corpses unless you're Famished!. If you're Hungry, nothing changes but you can eat again. If you're Famished!, then you now have a 10 point debuff to your quickness, which means (roughly) that every 10 turns, you lose a turn.
Carnivorouss((D), you cannot eat corpses unless you're Famished!. If you're Hungry, nothing changes but you can eat again. If you're Famished!, then you now have a 10 point debuff to your quickness, which means (roughly) that every 10 turns, you lose a turn.
Note that nothing happens when Famished! except for the quickness debuff. You are under no time pressure to eat; nothing else will happen to you.
All you need to do is make a campfire using the ![]() Make Camp skill and use that to cook. Many campfires already exist in the world as well as ovens, so you may alternatively use those to cook. You'll get a popup telling you that you're Famished!, so don't worry about this mechanic too much. Eat when you need to. There are skills you can get to make more use out of the eating mechanic; with the skills meals now become temporary buffs as basically a sort of potion mechanic.
Make Camp skill and use that to cook. Many campfires already exist in the world as well as ovens, so you may alternatively use those to cook. You'll get a popup telling you that you're Famished!, so don't worry about this mechanic too much. Eat when you need to. There are skills you can get to make more use out of the eating mechanic; with the skills meals now become temporary buffs as basically a sort of potion mechanic.
For thirst, there are 5 levels: Tumescent > Quenched > Thirsty > Parched > Dehydrated!
If you are
Amphibiouss((D), these levels are replaced by Soaked > Wet > Moist > Dry > Dessicated!. Again, they are the same just differently named for flavor.
Thirst is automatically taken care of for you as long as you have fresh water in your inventory. Depending on your settings, you will drink to maintain a certain threshold. If you fall below that threshold, you will drink to bring you above it. You can manually drink too, but there's no reason to do so. In fact, you can drink too much, in which case you will vomit. If you are Dehydrated!, you will constantly take damage so make sure that you maintain some water in your inventory.
Some creatures are capable of changing your thirst levels, but the main one you will encounter are thirst thistles.
Beside your hunger and thirst we have 3 numbers: 63/318# 35$. The 63/318# ratio is the weight of all your items that are currently equipped or in your inventory to the total weight you can carry. In this case, our carry capacity is 318 pounds due to our Strength score and our items cumulatively weigh 63 pounds. If the weight of your items exceeds your capacity, you will no longer be able to move. You may still use certain abilities to move or teleport, but basic movement will be impossible until you can handle the weight.
The 35$ is the amount of fresh water we currently have in our inventory in a unit of measure called drams. You can think of 1 dram of liquid being the smallest divisible unit in Qud. When you're thirsty, you drink 1 dram of water. The smallest amount you can pay for things is 1 dram. In this case, we have 35 drams of water, so we can drink 35 times before we run out. A ![]() waterskin or
waterskin or ![]() canteen can hold 64 drams of liquid and you'll start out with multiple in your inventory. Water management is something that can be confusing at the start, so let me make it really simple: try to carry about 128 drams of water (2
canteen can hold 64 drams of liquid and you'll start out with multiple in your inventory. Water management is something that can be confusing at the start, so let me make it really simple: try to carry about 128 drams of water (2 ![]() waterskins). If you're below 50, try not to travel more than 10 tiles away from a town. Carrying more than 192 drams is overkill and water can get heavy.
waterskins). If you're below 50, try not to travel more than 10 tiles away from a town. Carrying more than 192 drams is overkill and water can get heavy.
We'll come back to the 5 numbers that come next and move all the way to Harvest Dawn 6th of Nivvun Ut. This is the current date and the relative time of day, and is really just flavor text. Nobody will ever ask you to be somewhere on a certain day, but quests will sometimes ask you to wait a certain number of days. You can use this to keep track of when you need to return. For example, if someone asked us to come back to them 3 days from now, we would return on the 9th. Finally, we have the name of the current zone we're in: Joppa. We'll talk more about zones and parasangs later, but just know that every zone has a name and this is displayed here.
Statistics
We'll now return to those funny 5 numbers: QN: 100 MS: 120 AV: 3 DV 5 MA: 5. These are your combat statistics, and each one has significant impact on how well combat goes for you.
Quickness (QN)
The first number is quickness. For most of you, this will be 100. It can be improved with equipment, mutations like ![]() Heightened Quickness, and the rare liquid sunslag. Without getting too caught in the details, quickness can be thought of as the following: At what % efficiency do I perform actions in general? If you have 100 quickness, you perform at 100% efficiency. If you have 90 quickness, you perform at 90% efficiency, meaning that every 10 turns you lose a turn. If you have 110 quickness, you perform at 110% efficiency; this time meaning that every 10 turns you gain a turn. As you may imagine, this is extremely powerful and is one of the most powerful stats you could have.
Heightened Quickness, and the rare liquid sunslag. Without getting too caught in the details, quickness can be thought of as the following: At what % efficiency do I perform actions in general? If you have 100 quickness, you perform at 100% efficiency. If you have 90 quickness, you perform at 90% efficiency, meaning that every 10 turns you lose a turn. If you have 110 quickness, you perform at 110% efficiency; this time meaning that every 10 turns you gain a turn. As you may imagine, this is extremely powerful and is one of the most powerful stats you could have.
Movement Speed (MS)
The second number is your movement speed. There are far more ways to improve your movement speed, but where quickness is the efficiency at which you perform any action, movement speed is the efficiency you perform specifically movement actions. Only basic moves are considered here, so if you have a skill that moves you like ![]() Charge or
Charge or ![]() Jump, movement speed doesn't affect that. Something useful to note here is that quickness stacks with movement speed for movement actions, so having both high quickness and high movement speed will make you move faster than if you had just one or the other.
Jump, movement speed doesn't affect that. Something useful to note here is that quickness stacks with movement speed for movement actions, so having both high quickness and high movement speed will make you move faster than if you had just one or the other.
Armor Value (AV)
There is a lot to discuss when it comes to ![]() AV as it's one of Qud's most complex mechanics but I'll make it as simple as I can here. The third number is your armor value, which represents how hard it is for weapons to pierce your armor and deal damage to you. Generally speaking, a weapon with a penetration value (PV) can be expected to reliably pierce an
AV as it's one of Qud's most complex mechanics but I'll make it as simple as I can here. The third number is your armor value, which represents how hard it is for weapons to pierce your armor and deal damage to you. Generally speaking, a weapon with a penetration value (PV) can be expected to reliably pierce an ![]() AV of equal value. Your
AV of equal value. Your ![]() AV is the sum of the
AV is the sum of the ![]() AV granted to you by your armor (+1 if you have the
AV granted to you by your armor (+1 if you have the ![]() Calloused skill).
Calloused skill).
Dodge Value (DV)
The fourth number is your dodge value, which represents how hard it is for you to be hit in general. The way rolls to hit work is that a random number from 1-20 is rolled. The attacker's Agility modifier is added (plus other bonuses if they're available) and if the total is equal to or higher than the target's ![]() DV, the attack hits. Once an attack hits, it must roll past the
DV, the attack hits. Once an attack hits, it must roll past the ![]() AV of the target in order to deal damage and proc any effects that occur on penetration. Note that some damaging effects proc on hit only, and some effects (like explosions) don't even have to hit. Your
AV of the target in order to deal damage and proc any effects that occur on penetration. Note that some damaging effects proc on hit only, and some effects (like explosions) don't even have to hit. Your ![]() DV is the sum of the
DV is the sum of the ![]() DV granted to you by your armor, plus your Agility modifier and any bonuses from skills you may have.
DV granted to you by your armor, plus your Agility modifier and any bonuses from skills you may have.
AV or DV?
This is again a pretty complicated topic so I'll try and make it simple while you're still beginning. ![]() DV is all or nothing and very swingy. It is very unreliable as when you get hit, you will often get hit extremely hard. All it takes are a few lucky hits and your character can die, and when you will be getting attacked thousands of times in a single run it's bound to happen. Therefore, it's a bad idea to not have good
DV is all or nothing and very swingy. It is very unreliable as when you get hit, you will often get hit extremely hard. All it takes are a few lucky hits and your character can die, and when you will be getting attacked thousands of times in a single run it's bound to happen. Therefore, it's a bad idea to not have good ![]() AV as well. How much
AV as well. How much ![]() AV you should go for is where the debate stems from so I'll provide you a baseline that you can jump off from as you gain more experience in more runs.
AV you should go for is where the debate stems from so I'll provide you a baseline that you can jump off from as you gain more experience in more runs.
At the start of the game, you want to get to 6 ![]() AV as soon as you can. Once you have 6
AV as soon as you can. Once you have 6 ![]() AV, you can think of every point of
AV, you can think of every point of ![]() AV as being worth 2 points of
AV as being worth 2 points of ![]() DV. If the ratio is bad, it may not be worth the trade-off. Under 10
DV. If the ratio is bad, it may not be worth the trade-off. Under 10 ![]() DV, you're not missing much by going lower so if you can't reach 12
DV, you're not missing much by going lower so if you can't reach 12 ![]() DV or so with your gear setup, boost your
DV or so with your gear setup, boost your ![]() AV as much as you can. A safe
AV as much as you can. A safe ![]() AV to hit in the mid game is 10
AV to hit in the mid game is 10 ![]() AV; at this point if you have a very high
AV; at this point if you have a very high ![]() DV you can reasonably take hits to where you won't instantly splatter if you get hit by a hard-hitting attack. Any
DV you can reasonably take hits to where you won't instantly splatter if you get hit by a hard-hitting attack. Any ![]() DV past 25 is better spent towards
DV past 25 is better spent towards ![]() AV as the creatures that can hit 25
AV as the creatures that can hit 25 ![]() DV at all can hit it extremely easy due to the massive to-hit bonuses they have.
DV at all can hit it extremely easy due to the massive to-hit bonuses they have.
Something to note about
AV and
DV is that the benefit you get from equipment is averaged across all limbs of the same type, rounded down. For example, all player characters have 2 arms. If you equip a snakeskin bracelet (an item that grants 2
Mental Armor (MA)
The fifth and final number is your mental armor, which represents how resistant you are to mental attacks. Psychic abilities will roll against your MA instead of your ![]() AV, so this number is literally just your
AV, so this number is literally just your ![]() AV for mental attacks. This is improved by your Willpower modifier, the
AV for mental attacks. This is improved by your Willpower modifier, the ![]() Mental Mirror mutation and by some pieces of high-level equipment, so generally speaking you can't do much about this for the majority of the game.
Mental Mirror mutation and by some pieces of high-level equipment, so generally speaking you can't do much about this for the majority of the game.
The Game Screen
Let's bring back that image again for reference
Below the date, you can see a number of icons. These are for mouse players and will explain their function if you hover over them with your mouse. If you play with your keyboard only, these won't do anything for you but don't worry; every bit of functionality found there has a keyboard-only analogue! We won't cover these now, but in a future article we'll talk about useful hotkeys so keep reading.
To the left of these icons and below the majority of our statistics are two large bars, one green and one grey. As you might be able to tell by the text within the bars, the green bar is our current Hitpoints (![]() HP) and the grey bar is our current level (LVL) and experience points (EXP) towards our next level. As you might imagine, if your
HP) and the grey bar is our current level (LVL) and experience points (EXP) towards our next level. As you might imagine, if your ![]() HP is reduced to 0, your character dies and what happens next depends on the game mode you chose before starting the game:
HP is reduced to 0, your character dies and what happens next depends on the game mode you chose before starting the game:
- If you picked Classic, the character is dead for good and the save is deleted.
- If you picked Roleplay or Wander, you will respawn at your last village checkpoint.
Other than this, there is no difference whatsoever between Classic and Roleplay game modes. You will not be locked out of any achievements, endings, secrets, anything at all if you did not pick Classic. With Wander, the only difference is the EXP drops and what creatures are hostile to you.
What Game Mode Should I Pick?
This is a question of preference, so I can't answer it for you but I can give you some information to hopefully inform your own decision. Classic is a more difficult, hardcore experience suited to you if you want a challenge or if you earnestly wish to improve at the game. The series of articles on this website are directed at individuals playing on Classic mode; but this just means the advice is considering death to be the end and avoided at all costs.
Roleplay is good if you have limited time to play and still wish to see all the content that Qud has to offer in a reasonable amount of time. It will potentially teach you some bad habits should you want to do more difficult challenges or play on Classic later, so do be aware. This mode also keeps intact the intended experience of the game.
Wander mode is for those who aren't interested in combat and instead just want to explore the world and learn about the lore, or perhaps individuals that wish to make friends with all the factions instead of taking each one to a brutal death match in the salts. As you might imagine, this mode has even more potential to teach you bad habits than Roleplay but if you're not interested in the challenge to begin with it may not be an issue for you.
The big rectangle below the EXP bar and on the left side of the screen is the main game screen. This is where you can see your character, the terrain of the world and the creatures that inhabit it. If this is your first time playing a game with a minimalist graphical style like Caves of Qud, it may take some time to get used to how things are represented. A common habit that you should get into is pressing the [l]ook key (default is "l") in order to read the description of creatures and learn information about them. In Qud, information is power and using [l]ook is one of the strongest things you can do.
You might be curious why I'm writing [l]ook in that weird way. Well, that's because the key used for that functionality is the one in brackets (l). In the Qud community, it's very common to write functionality tied to keys in this way. If you see this in the future, just know that it means that key is the shortcut to that functionality!
Beside the main game screen are two panels stacked on top of each other: a minimap of the zone you are currently in and a chat log of events that occur in the game. If you haven't fiddled with any of the settings, it's likely that you don't have a minimap visible. If you would like that, make sure to turn it on in the options (Esc > Options > UI > Show minimap). If something happens too fast for you to catch it, look at the chat log to see a log description of what happened.
The Bottom Bar
Once more, let's bring back that image for reference
There are actually 2 bars here, but the top one is skinny and easily missed. The top details 3 things:
- Active effects
- These are things that are currently ailing your character, and can be good or bad. You can see more detailed information by going to the effects menu ([x] > [e]).
- Current target
- This is information about the creature you have targeted. Unless done manually, this will be whatever you've been attacking. Look here to easily see how the combat is going for you.
- Missile weapon information
- If you have a missle weapon (bow or gun) equipped, you'll see a readout here of which weapon it is and how much ammunition you have left before needing to reload.
Finally, we have the [a]bilities bar. This is a subset of the current activated or toggleable [a]bilities you have. By pressing the key indicated in [ ], you can activate that ability. Ctrl + Tab will scroll the bar to the next set down, while Ctrl + Shift + Tab scrolls the bar up. If you want to reorder the abilities, you do so in the [a]bilities menu with [+] and [-]. This will grow out as you level up and learn more things that you can do.