Grave Thoughts / A Call to Arms / The Assessment
Having returned from Omonporch, we didn't come alone. A strange rumbling around the compound brings unwanted visitors, and we must now defend Grit Gate in its time of need. To Arms! Live and drink, journeyfriend.
Recommended
| Level | Abilities | Stats |
|---|---|---|
| 30 | 8 |
Baked Defenses
We have a considerable number of turns to prepare for the attack after we feel the rumbling. Whether or not we go to Ereshkigel doesn't matter, the templars will come in regardless. The force will consist of 2 groups, typically with 1 having a larger drop radius than the other. The 2 groups also are not guaranteed to drop at the same time either. We have quite a few ways of preparing our defenses offered to us, which we'll cover now.
Overclock Chromelings
Pretty weak, but if you've got leftover power then hey might as well.
Power Laser Emplacement
These will remove some focus to yourself, but can also shoot you and allies. They also won't shoot if there is an ally in between them and the target, so for the power these draw you probably won't use these unless they're in a really convenient location.
Activate Rodanis Y
![]() Rodanis Y is a powerhouse and can easily handle a few templars on its own. Since it has
Rodanis Y is a powerhouse and can easily handle a few templars on its own. Since it has ![]() Dismember skills, if it gets the right luck it can even handle the templar leader. It does suck a ton of power, however, and we cannot direct it to go to a particular location. For these reasons,
Dismember skills, if it gets the right luck it can even handle the templar leader. It does suck a ton of power, however, and we cannot direct it to go to a particular location. For these reasons, ![]() Rodanis Y is only really useful if one of the drop parties will land nearby.
Rodanis Y is only really useful if one of the drop parties will land nearby.
Power Force Projectors
There are actually a considerable number of force projectors all around Grit Gate. While these are actually quite useful, I find they will oddly run out of power at the worst possible times, even when there is power left in the grid. My only conclusion is that each force projector is connected to a particular energy source with a cap on how much energy it can provide, and exceeding that will cause the projector to drop. Therefore, I do not like to rely solely on them but these tend to be the largest use of power for my runs. You should be clever about using them, as any force projectors nearby a drop party will be immediately EMP'd and rendered useless.
Preparation
These options are all not that great. Over time, I have migrated from using these defense mechanisms heavily into hardly using them at all. If you simply want to get past this mission, relying on the denizens of Grit Gate will carry you far and usually be enough to claim victory. Power up ![]() Rodanis Y and some
Rodanis Y and some ![]() chromelings and you'll have a chaotic battle, but one where victory is nearly guaranteed.
chromelings and you'll have a chaotic battle, but one where victory is nearly guaranteed.
However, I am not merely interested in victory at any cost here. I have a vested interest in keeping exactly 3 Barathrumites alive: ![]() Sparafucile,
Sparafucile, ![]() Jacobo, and
Jacobo, and ![]() Mafeo. These 3 are all restocking merchants that sell very useful things, and I would quite prefer to have them alive to sell me more stuff. Since I cannot guarantee which urshiib will be in which place at what time, I cannot guarantee their safety with the conventional method described above. Here we arrive at my personal method for victory.
Mafeo. These 3 are all restocking merchants that sell very useful things, and I would quite prefer to have them alive to sell me more stuff. Since I cannot guarantee which urshiib will be in which place at what time, I cannot guarantee their safety with the conventional method described above. Here we arrive at my personal method for victory.
Portable Walls
![]() Portable walls are simply the most accessible way to perform this strategy, but
Portable walls are simply the most accessible way to perform this strategy, but ![]() step sowwers or
step sowwers or ![]() 3D cobblers would also do the job. The idea here is to figure out where the templar will drop, and then wall them in so they cannot get out until you let them out. There are many places where they can drop, and not every place will allow you to tidily perform this strategy (they can even drop dead-center of Grit Gate), most configurations will at least allow you to wall in a single group if not both.
3D cobblers would also do the job. The idea here is to figure out where the templar will drop, and then wall them in so they cannot get out until you let them out. There are many places where they can drop, and not every place will allow you to tidily perform this strategy (they can even drop dead-center of Grit Gate), most configurations will at least allow you to wall in a single group if not both.
In order to pull this off, you will need a variable amount of ![]() portable walls. Most places can be safely walled off with a single
portable walls. Most places can be safely walled off with a single ![]() portable wall, but some will need 2 or more. To be safe, it is recommended that you either come with 4
portable wall, but some will need 2 or more. To be safe, it is recommended that you either come with 4 ![]() portable walls or come with the capability to have at least 4
portable walls or come with the capability to have at least 4 ![]() portable walls. A legendary templar will always have 1
portable walls. A legendary templar will always have 1 ![]() portable wall on them, so if you're incapable of
portable wall on them, so if you're incapable of ![]() Tinkering them yourself (requires
Tinkering them yourself (requires ![]() Tinker II), then you'll have to search for those legendary templars ahead of time.
Tinker II), then you'll have to search for those legendary templars ahead of time.
Your goal in placing the wall is twofold:
The wall should be placed in a position that completely contains all the templar. This means your container should be slightly bigger than the depicted red circle of the drop. When placing the wall, you want to ensure that no Barathrumites will get locked in or caught in the crossfire.
Our true objective in placing these walls is to protect the Barathrumites; never forget that. It may be easier to contain the urshiib rather than the templar; especially if they are all sleeping and the templar are not dropping in the bedrooms. The reason the walls in particular are more preferred than the force projectors is precisely because the force projectors will not keep the Barathrumites out. In a pinch, they can be useful since if the templars do not have a way to pathfind to an enemy, they will just stand still.
When placing the wall, you need to also be aware of what to do when you inevitably need to break a hole in it to kill the templar. Ensure that you have a plan for this, such as leaving a single hole in the container for the first drop party and having a final wall to place behind you before opening the seal on the second. You may also consider shaping a favorable chokepoint in the container and ![]() Phasing through to fight the templar.
Phasing through to fight the templar.
If you're looking for inspiration on places to put walls or where exactly the force projectors are, you can refer to the following map of Grit Gate:
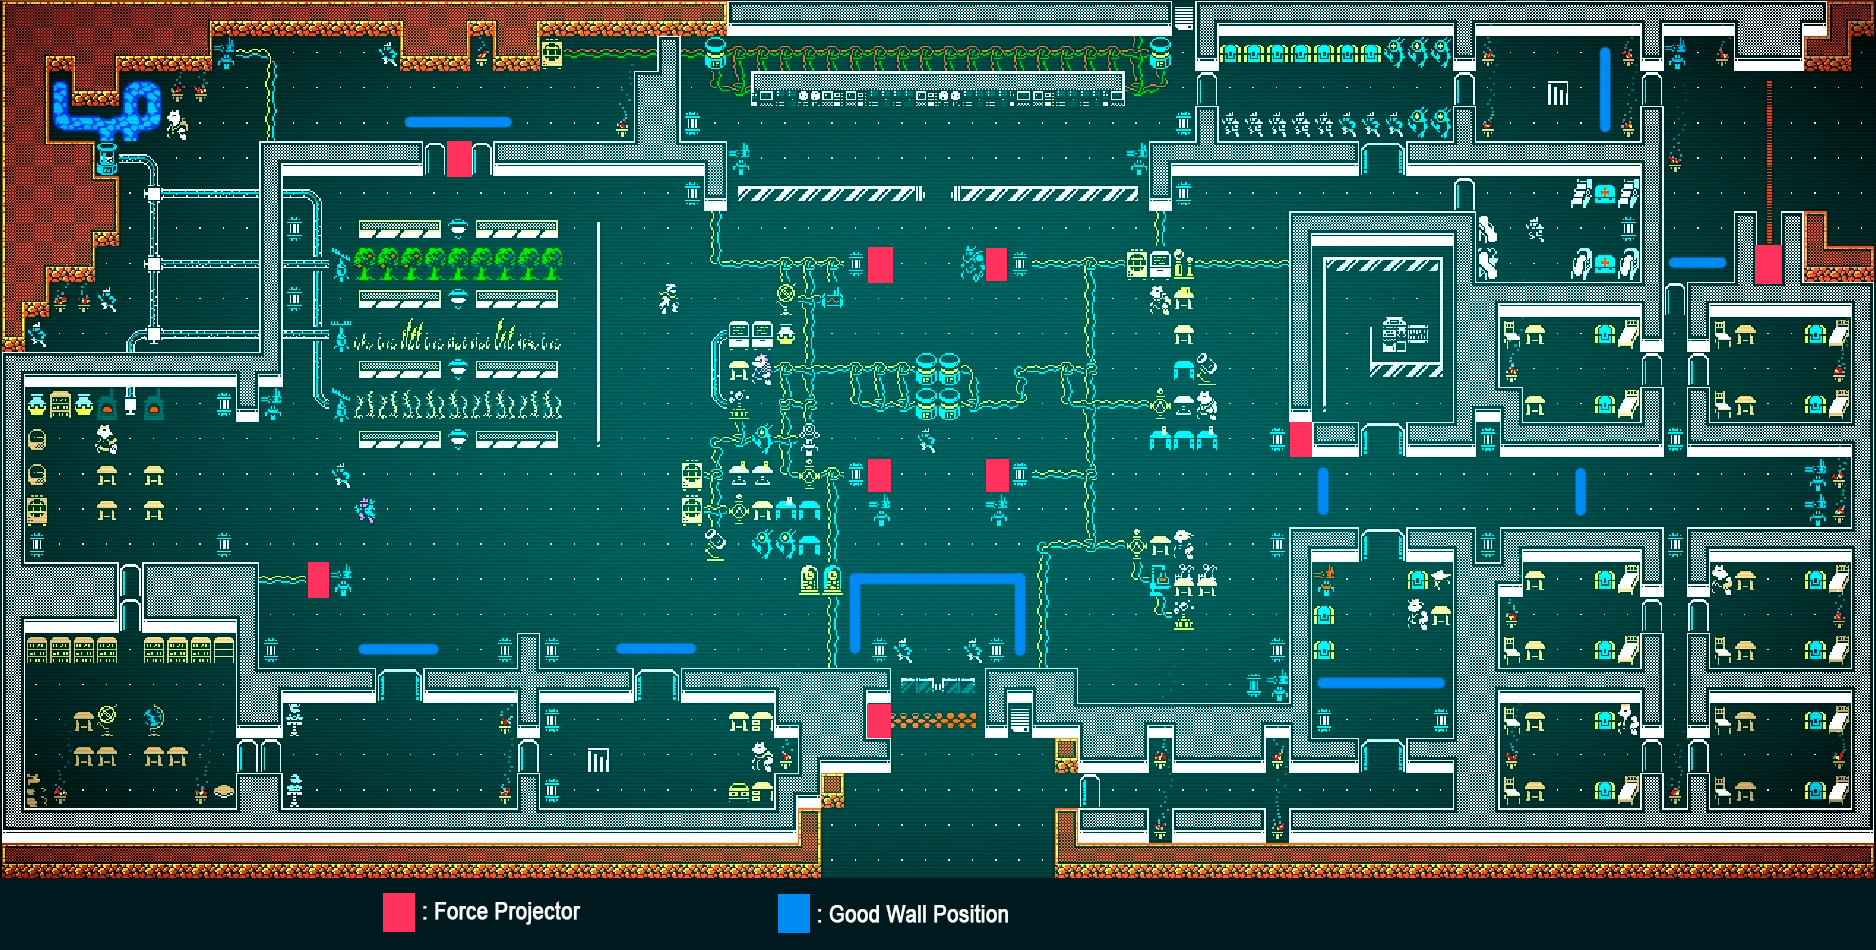
🗒️ Note: This map is heavily simplified on the places to put walls, and does not include every scenario. You will likely place walls in different places than these, but they are here for inspiration as to good chokepoints to seal off. I've placed walls with great effectiveness in some rather strange places, but they've always kept these chokepoints in mind and followed the goal of keeping the urshiib alive.
The Attack
Once the templar arrive, they tend to prioritize throwing an excessive amount of grenades at you to start things off. If you are the only one present, oftentimes you will be hit with a stasis grenade and everything else will be wasted. Normally this is bad because then you're not there to help the urshiib, but if there are no urshiib in range for the templars to attack then this is inconsequential. You can also consider using grenades of these types to your advantage; to put yourself in stasis ahead of time or to EMP the templars as they drop in. Once one gets close to you, the others will not want to throw a grenade through their ally. You can use this to your advantage; to lure a templar into melee with you and throw grenades past them to the rest of the group.
The ![]() flamethrower and
flamethrower and ![]() freeze ray work exceptionally well here, as if you can construct an “L” shape in your fighting arena, you can use line of sight to fight a single enemy at a time. You can then use the
freeze ray work exceptionally well here, as if you can construct an “L” shape in your fighting arena, you can use line of sight to fight a single enemy at a time. You can then use the ![]() freeze ray or
freeze ray or ![]() flamethrower to incapacitate your single opponent and kill them easily; rinsing and repeating for the rest of the templar. Even if you don't do this, the fact that an enemy on fire will not fight back typically and a frozen enemy cannot fight back can be used to your advantage to single out templars with dangerous weapons, such as
flamethrower to incapacitate your single opponent and kill them easily; rinsing and repeating for the rest of the templar. Even if you don't do this, the fact that an enemy on fire will not fight back typically and a frozen enemy cannot fight back can be used to your advantage to single out templars with dangerous weapons, such as ![]() freeze rays and
freeze rays and ![]() flamethrowers they have themselves.
flamethrowers they have themselves.
If you don't happen to have those weapons, disarm in particular works wonders here; especially if you can get the templar to trickle in one at a time. Being creatures that rely on weaponry, they are extremely vulnerable when that weaponry is taken from them. Additionally, having good resistance against being knocked prone (asphalt cooking effects, fitted with cleats mod, ![]() motorized treads, etc) will be quite handy as the leader of the group likes to spam
motorized treads, etc) will be quite handy as the leader of the group likes to spam ![]() Shield Slam.
Shield Slam.
Knight Commander of the Holy Temple
Speaking of the leader of the group, they are consistently the largest problem. Let's go over the abilities of this creature.
First off, they will be legendary which means a significant attribute increase from normal creatures of its type. Next, the conventional weapon skills. It has ![]() Weapon Expertise and
Weapon Expertise and ![]() Penetrating Strikes, so
Penetrating Strikes, so ![]() AV will help but not give you immunity. It supplements this with
AV will help but not give you immunity. It supplements this with ![]() Deft Blocking to heighten its own
Deft Blocking to heighten its own ![]() AV and
AV and ![]() Staggering Block combined with its enhanced Strength from legendary status makes attacking it tricky as it will often stun you.
Staggering Block combined with its enhanced Strength from legendary status makes attacking it tricky as it will often stun you. ![]() Shield Slam is then used to continue to lock you down if you aren't stunned from being
Shield Slam is then used to continue to lock you down if you aren't stunned from being ![]() Blocked.
Blocked.
It supplements these abilities with ![]() Berate to make you easier to hit and slow you down and
Berate to make you easier to hit and slow you down and ![]() Menacing Stare to cause you to lose your positioning and fail to counterattack. With all of these factors combined it becomes very easy for yourself to get locked down and killed before you can mount a proper defense.
Menacing Stare to cause you to lose your positioning and fail to counterattack. With all of these factors combined it becomes very easy for yourself to get locked down and killed before you can mount a proper defense.
The best solution for this is to of course do the locking down first or to fight from a range. Range is not necessarily recommended since that opens you up heavily to being attacked from the plethora of grenades and missile weapons from the backup team. The ![]() anchor spikes and
anchor spikes and ![]() reactive cranial plating cybernetics give extreme resistance to the normal lockdown methods of the Commander, and you can potentially cook with dried lah petals and another ingredient to give a triggered effect that grants immunity to fear to avoid
reactive cranial plating cybernetics give extreme resistance to the normal lockdown methods of the Commander, and you can potentially cook with dried lah petals and another ingredient to give a triggered effect that grants immunity to fear to avoid ![]() Menacing Stare.
Menacing Stare.
Otherwise, skills like ![]() Lionheart and
Lionheart and ![]() Shake It Off can be utilized to resist their respective effects, or if you have the
Shake It Off can be utilized to resist their respective effects, or if you have the ![]() Two-headed mutation that takes care of everything except being knocked prone. Disarm is also incredibly effective if you happen to be capable of it.
Two-headed mutation that takes care of everything except being knocked prone. Disarm is also incredibly effective if you happen to be capable of it.
Despite your best efforts, sometimes you'll just get a bad configuration or the templar will strangely drop far beyond the indicator circle or ![]() Shem -1 will just inexplicably be dead even though you never saw it the entire time. The goal with these strategies is to merely mitigate the damage in the most consistent way. Unfortunately, this is the one mission that has eluded perfect consistency for me, but has been the only time I have finished this mission without any Barathrumites dying.
Shem -1 will just inexplicably be dead even though you never saw it the entire time. The goal with these strategies is to merely mitigate the damage in the most consistent way. Unfortunately, this is the one mission that has eluded perfect consistency for me, but has been the only time I have finished this mission without any Barathrumites dying.